Table of Contents
- 1. Introduction
- 2. Considerations and planning
- 2.1. Goals
- 2.2. How to make services accessible from the internet
- 2.3. Requirements overview
- 2.4. Tunneling solution
- 2.4.1. VPS
- 2.5. Virtualization and containerization
- 2.6. File system
- 2.6.1. Introduction to ZFS
- 2.6.2. Protection against hardware failure
- 2.6.3. Integrity checks and automatic repairs
- 2.6.4. Extensibility
- 2.6.5. Hot spares
- 2.6.6. Portability
- 2.6.7. Compression
- 2.7. Backups
- 2.7.1. The “3-2-1” rule
- 2.8. Memory
- 2.9. Monitoring
- 2.10. Threats and mitigations
- 3. Planning the hardware
- 3.1. Main server
- 3.1.1. Cases
- 3.1.1.1. Tower cases
- 3.1.1.2. Rack mounted
- 3.1.2. Motherboards
- 3.1.3. ECC Memory
- 3.1.3.1. CPU
- 3.1.3.2. Motherboard
- 3.1.3.3. Memory stick
- 3.1.4. GPU
- 3.1.5. PSU
- 3.1.6. Storage
- 3.1.7. Complete builds
- 3.1.7.1. Build A: cheapest AM4, no ECC
- 3.1.7.2. Build B: AM4, with ECC memory
- 3.1.7.3. Build C: AM5, with ECC memory
- 3.2. Backup server
- 3.3. Routers
- 3.4. UPS
- 4. Shopping list
- 5. Building the servers
- 6. Software configuration
- 6.1. Install Debian
- 6.2. Change the password
- 6.3. Install and enable Fail2Ban
- 6.4. Set static IP
- 6.5. Synchronize time
- 6.6. Install Docker
- 6.6.1. Configure Loki with Docker plugin
- 6.7. Install JavaScript runtimes and tools
- 6.7.1. PM2 process manager
- 6.8. Other useful tools
- 6.9. Main server (Melchior)
- 6.9.1. Install ZFS
- 6.9.2. Create the HDD pool
- 6.9.3. Create the SSD pool
- 6.9.4. Import the pools
- 6.9.5. Setup ZFS snapshots and retention policy
- 6.9.6. Other useful ZFS commands
- 6.9.6.1. Rename a pool
- 6.9.6.2. Change mountpoint
- 6.9.6.3. Import pool from another server
- 6.10. Bastion server
- 6.11. Other resources
- 7. Showcase
- 8. Conclusion
- 8.1. Regrets
- 8.2. Future improvements
Introduction
Hi! Do you enjoy spending time, money, and energy tinkering with servers at home when you could get paid for it? Or maybe you already are a sysadmin, but you want to learn and experiment in a more casual environment? Oooor maybe, you want to stick it to the tech overlords and take back control on your data and everyday tools?
Whatever your reason, you are not alone. I’ve been feeling the same pull toward owning more of my digital life. Part of it is the simple joy of building things, but also, I can’t help but notice how the internet is changing.
Between the UK’s Online Safety Act, the various laws passing in the US, and the recurring “Chat Control” proposals in the EU, it’s impossible to ignore the trend: anonymity and privacy are increasingly under threat.
And on top of that, we’re watching major platforms go through the familiar cycle of enshittification. Propelled by an established and enthusiastic userbase, they go public or get bought up by a bigger company. Months or years later, shareholders or the acquiring company start pushing the platform to squeeze out more profit. That’s when the decline begins: long-standing features disappear without warning, or get locked behind a “premium” subscription tier. Ads creep in, your data becomes training fodder for AI models, and open ecosystems are walled off by blocking third-party clients and tools.
In the wake of such trends, it’s up to us to reclaim autonomy over our digital data and the everyday tools we are depending on.
At its core, a homelab is a personal playground where you can learn and experiment with servers, applications, and services. It goes hand in hand with another concept, self-hosting: the practice of running services yourself, on hardware you control, instead of relying on big tech. Together, it means that you can build your own IT infrastructure, tailor the tools and services you use to your needs and keep your data safe and private.
If this sounds interesting to you, welcome aboard! I would like to share my journey with self-hosting, raise awareness about important considerations, and guide you through the process. As an appetizer, here’s the list of services I like to run on mine:
- Vaultwarden: a lightweight password manager, alternative to Bitwarden.
- File browser: organize, share, and control access to your files.
- Syncthing: synchronize files between across devices, perfect for personal backups.
- Jellyfin: stream movies and series privately, like a personal Netflix.
- Navidrome: private music streaming, similar to Spotify.
- Immich: manage and organize your photos and videos, like a private Google Photos.
- Sure: track and categorize expenses to manage your finances.
- This very blog: my own personal space to express myself and share my knowledge.
With the basics out of the way and a taste of what’s possible, it’s time to roll up our sleeves. Let’s start building a homelab!
Considerations and planning
When starting any large project, it’s important to define your goals. They will guide you through the entire process and help you make decisions.
- Goals are what you want to achieve with the project. They are meant to be broad and high-level.
- Requirements translate the goals into concrete actions. They may also include additional constraints.
- Scope sets the boundaries of the project. I find it useful to define that boundary by listing what’s out of the scope.
Let’s start with the goals.
Goals
As discussed in the intro, privacy and digital autonomy are key motivations for many people. They may have experienced one too many bad experience with enshittification or other egregious decisions made by the companies they rely on. They want to use services that are under their control, evolve at their pace, and not vanish because a company changed direction.
But for others, it can also start as a simple curiosity and a desire to learn: a way to deepen your understanding of Linux, networking, coding, or infrastructure by actually running the things you usually only read about. A homelab is a safe playground where you can experiment, break things, fix them, and come away with real skills.
The appeal can also be practical. Maybe you have a media library on a hard drive and you think it would be neat to be able to access it from anywhere, including on the go. Or a bunch of photos and videos you want to share with your family and friends. Maybe, like me, you want to have a personal corner of the internet where you can express yourself freely.
While typically not the main motivation, self hosting can also be cost saving, especially in the long run. This is particularly true if you or your family are reliant on a number of subscriptions or if you have copious amounts of data you need to store and access.
Those are some of the broader motivations that often bring people into the homelab/self-hosting world. With that in mind, here are the goals that guide the design of my setup (in order of importance):
- I want my data to be safe. I want to feel reassured that my data can’t be lost or corrupted.
- I want to keep things simple and reliable. I don’t want to spend all my free time troubleshooting or fixing things.
- At the same time, I want to experiment with new services and tools without feeling limited scared to break existing things.
- I want to keep my homelab reasonably compact, quiet, and cost effective.
- I want to reduce my reliance on any specific provider and to be able to move effortlessly to another provider or offer if needed.
By clarifying your goals upfront, you create a roadmap for every decision you make—from choosing hardware to picking file systems, containers, and backup strategies. Every choice in this guide ties back to these motivations, and yours may differ but having them written down keeps the project focused and intentional.
How to make services accessible from the internet
Before I start expanding on the requirements, I want to give you a concise explanation of how hosting works and the challenges associated with it. That way, we are all on the same page and the rest of the guide will make more sense. If you are already familiar with the topic, feel free to skip this section.
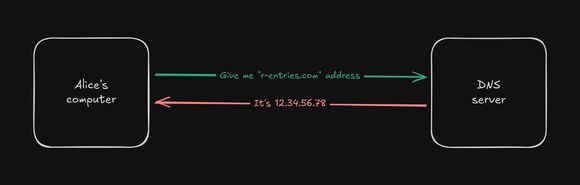
In this example, we will be hosting my blog, r-entries.com.
When a user, let’s say Alice, tries to access the blog, their browser will send a request to a DNS server to find the IP address of the website.
DNS is like a phone book for the internet. In this case, let’s say the returned IP address is 12.34.56.78.
Now that the browser knows the address, it will prepare and send a request to that address. In an ideal world, the server is directly accessible from the internet, so it receives the request, process it, and sends the response back to the browser.
The browser then receives the response and displays the content of the blog.
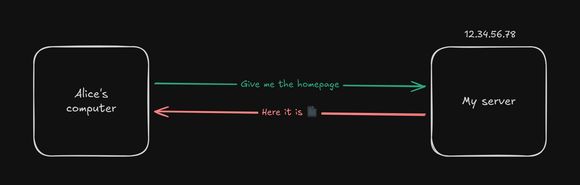
And that’s it! Quite simple, don’t you think?
No chicken or the egg dilemma here! DNS servers are pre-configured either by the home router, in the device settings or the browser settings. They are configured with an IP address and not a domain name, removing the circular dependency.
But in reality, it’s highly unlikely that the server is directly accessible from the internet. When we say “IP” we typically mean IPv4. It’s the protocol used to uniquely identify devices on the internet. It was first deployed in the 1980s at a time where the “internet” was still a small community of researchers and universities. With a little over 4.2 billion possible addresses, it was far enough to cover the needs of the time. But as the internet grew, the possibility of running out of addresses became more and more imminent.
If the mid 90s, NAT was introduced to help alleviate the address exhaustion problem. Before the introduction of NAT, every connected device had a globally unique IPv4 address, just like the earlier example with Alice. With NAT, devices behind a router will be assigned a local IPv4 address, and the router itself will only use a single public IPv4 address.
Businesses typically have a single public phone number, instead of dedicated landlines for each employee. When you call it, the receptionist answers and then routes you to the right person. Internally, they may have a local network of phones, with internal numbers for each employee. These internal numbers are unknown to the public, and even if they were, they couldn’t be used to call an employee directly.
So NAT is really the same idea but applied to computers on the internet. Instead of a receptionist, you can configure the NAT table to forward different requests to different internal devices.
Let’s update the diagram to reflect the introduction of NAT:
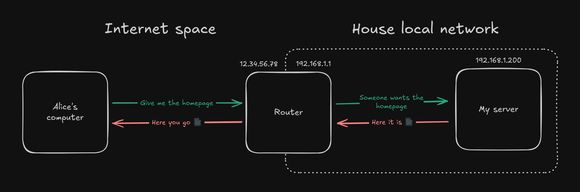
When the router receives the request, it will look up the destination IP address in the NAT table.
If you configure it correctly, it will find the local IP address (e.g: 192.168.1.200) of the server and forward the request to it.
You’ll also notice that the router—sitting right on the edge between the internet and the local network—posseses both a public and a local IPv4 address. The internal address is used by devices within the local network to reach the router. Meanwhile, external devices use the public address to contact the router.
Unfortunately, this is not enough. With the adoption of mobile devices, the number of devices connected to the internet exploded. Mobile carriers had to find a way to accommodate for the flood of new devices and decided to introduce CGNAT. It’s carrier grade because it’s not done at the level of the home router, but at the level of an entire network of routers.
When applied to home ISPs, it means that you are no longer assigned a public IPv4 address, but a local one. Nested layers of local networks with NAT placed at each boundary to forward requests appropriately.
This doesn’t impact the average user, but it has major implications for self-hosting. The problem is that you don’t have access to the carrier’s NAT table. And even if you did, it basically means only one customer could make use of the public IPv4 address.

So… self-hosting is no longer possible in modern, IPv4-exhausted, internet?
There are actually several solutions to circumvent this issue:
-
Ask your ISP to move you from a CGNAT network and provide you with a dedicated public IPv4 address. They may tell you such feature is not available on your standard plan and you need to upgrade to a business-oriented plan. This typically costs several times more than a standard plan.
-
Support IPv6 only. IPv6 address space is so much larger than IPv4, it doesn’t have the same address exhaustion problem. With IPv6, say goodbye to NAT and CGNAT: every device has a unique global IPv6 address, just like it used to be with IPv4. It’s the future of the internet, but unfortunately, not all ISPs support IPv6 yet. The adoption is still still under 50% worldwide. If it continues at this rate, it may take another 15 years to reach near-universal adoption.
-
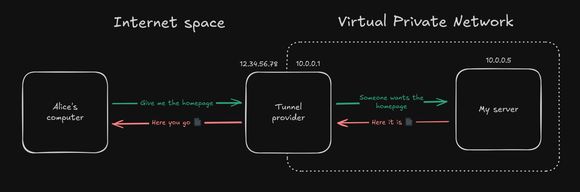
Use some form of tunneling. Tunneling is a technique to encrypt and forward traffic through a secure channel, crossing the NAT and CGNAT boundaries.
I won’t go into the details of how tunneling works, but if you ever used a VPN, that’s what they use. With a tunnel, you recreate a standard NAT setup, completely bypassing the CGNAT:
It exists a few different types of tunneling:
-
Reverse tunnel services like Cloudflare Tunnel. However, you have to trust the provider to not snoop on your traffic which is temporarily decrypted on their end. Personally, I’m not comfortable with this solution: I find their free-tier far too generous and that makes me doubt their intentions.
-
Use a VPN service like NordVPN, TorGuard, or Windscribe. Look for a provider that can offer a dedicated public IPv4 address (which typically comes with an extra cost).
-
Rent a VPS from a provider. No need to go into the details, what matters is that it’s a server that can be remotely accessed and controlled. This is the solution I’m going to use to make my services accessible from the internet. I’ll explain the reasoning behind this choice in the next section. Make sure they provide a public IPv4 address as part of the service.
And that’s it for the foundational networking knowledge. I hope you found it interesting and informative. It will be useful for understanding same of the decisions I’ll be making later on.
Requirements overview
To achieve the goals I’ve outlined earlier, I’m planning to use a 3 part system:
- A main server, the data/computing server of the homelab. It will be hosted at my place.
- A bastion server, the entrypoint to the homelab and its services. It will be hosted at a VPS provider.
- A backup server, where offsite backups will be stored. It will be hosted at my mom’s place.
What I mean by a bastion server is a server that is used to access the homelab and its services from the internet. As explained earlier, because of CGNAT and other network restrictions, the main server cannot be directly accessed from the internet. So we need a bastion server to act like a gateway and to tunnel the requests to the main server.
I could have choosen another type of tunneling, like a VPN service that offers a dedicated public IPv4 address. But I think a VPS is more sensible and flexible. Entry-level VPS starts under 5€/month, which is on par with VPN services. Beside, you can get a lot more from a VPS. It’s a full-fledged server after all. Also, unlike a VPN or Reverse tunnel service, you typically have full control over the server’s software. Sometimes you even get to install the OS yourself. In conclusion, a VPS seems like the best option among the available solutions.
And lastly we have the backup server. As I stated in my goals, data safety is my top priority. Having a backup server located elsewhere is a great way to protect against disasters or home break-ins. If the main server is stolen or destroyed, the backup server can be used to restore the latest backups. If the backup server is stolen or destroyed, the latest data is still safe on the main server.
Let’s in the following sections, I’ll explore different aspects of the project and which choice best aligns with my goals.
Seeing this 3 part system, I’m thinking of naming the servers Melchior (main), Balthasar (bastion), and Casper (backup). This is a reference to the Magi System from Neon Genesis Evangelion.
Tunneling solution
I’m thinking of running Pangolin on the bastion server. It’s a tunneled reverse proxy that seems to take some inspiration from Cloudflare.
It creates WireGuard tunnels between itself and the nodes. You can then expose services without requiring a static IP or opening ports on the ISP router.
You can create rules based on the service, path, IP, and country to either block, allow, or require authentication.
Authentication can take a few forms: a password, pin code, user identity with or without 2FA, or even external providers. Sharable links are also supported. Users don’t need to install anything. They are redirected to the login page when trying access the services in their browser.
Pangolin can also manage SSL certificates with Let’s Encrypt as the issuer.
It can also work in tandem with CrowdSec, a modern, open-source, collaborative behavior detection engine, integrated with a global IP reputation network. It functions as a massively multiplayer firewall, analyzing visitor behavior and responding appropriately to various types of attacks.
Pangolin can be installed on any VPS using Docker. Then from its interface, you can generate credentials to be used on the nodes. On the nodes you just need to run Newt, a lightweight WireGuard client. Again you can use Docker to configure and run Newt.
VPS
Recommended specs for running Pangolin:
- CPU: 2 vCPU
- RAM: 2GB
- Storage: 20GB SSD
Considering my internet speed, I would like a provider with at least 1 Gb/s speed:
Speedtest by Ookla

      Server: BOUYGUES TELECOM CUBIC - Poitiers (id: 53171)
         ISP: Bouygues Telecom
Idle Latency:     4.64 ms   (jitter: 0.37ms, low: 4.48ms, high: 4.99ms)
    Download:  2337.22 Mbps (data used: 1.2 GB)
                  6.99 ms   (jitter: 5.93ms, low: 5.32ms, high: 225.12ms)
      Upload:   938.80 Mbps (data used: 469.5 MB)
                 11.88 ms   (jitter: 0.84ms, low: 4.95ms, high: 12.90ms)
 Packet Loss:     0.0%
  Result URL: https://www.speedtest.net/result/c/4dc31e67-dfd6-47dc-bed6-136f30ea4399
Here’s a few providers I’m considering:
-
IONOS
- 2 vCores CPU
- 2 Go RAM
- 80 Go NVMe
- 1 Gb/s speed with unlimited traffic
- Restricted OS options (Ubuntu, Debian, Rocky, Alma)
- EU hosting (UK, Spain, Germany)
- No backups / snapshots
- 60 € / year (monthly bind) or 50 € / year (yearly bind)
-
OVH
- 6 vCore
- 12 Go ram
- 100 Go SSD NVMe
- 1 Gb/s speed with unlimited traffic
- 100 € / year (monthly bind) or 85 € / year (yearly bind)
-
o2switch
- 8 vCores
- 16 GB RAM
- Unlimited NVMe storage (I/O 16MB/s)
- 1 Gb/s speed with unlimited traffic
- 100 € / year (yearly bind)
-
Contabo
- 3 vCPU Cores
- 8 GB RAM
- 75 GB NVMe
- 1 Snapshot
- 200 MB/s speed with 32 TB traffic per month
- 50 € / year (monthly bind) or 40 € / year (yearly bind)
Virtualization and containerization
Virtualization offers strong isolation and the ability to run multiple operating systems on the same hardware. However it also adds extra overhead and complexicity.
Containerization offers a lighter weight alternative to virtualization. They are fast to deploy, there’s barely any overhead, and they are easy to manage. However, they don’t offer the same level of isolation as virtualization.
In my previous home lab, I was running XCP-ng as the hypervisor. Then I had a few VMs running on it. And each would use Docker containers to run services. But all the VMs were running Debian, so I’m unsure if it was worth the complexity of running a hypervisor. Also I think having to choose how much ressource to allocate to each VM was a bit of a pain, especially when you realize you need to expand the VM’s storage.
Thus, my plan is to run Debian on bare metal on all three servers. And use Docker containers to run services. If in the future I decide that virtualization is needed, I can always install Proxmox VE on the main server. Proxmox is already shipped with Debian so installing it should be simple enough. They have a guide for that.
File system
Introduction to ZFS
So I’ve heard of ZFS before, but I’ve always thought it looked complicated and intimidating. Probably because it does a lot more than your average filesystem.
ZFS, or more specifically OpenZFS, describes itself as an “open-source storage platform”. Here’s a few of its key features:
- Protection against hardware failure with mirroring and RAIDZ.
- Protection against data corruption with integrity verification and automatic repairs.
- Built-in snapshots and replication.
- Transparent compression
- Support for massive files and massive storage capacities (ZFS stands for Zettabyte File System after all).
- Support transparent compression and hardware-accelerated native encryption.
Protection against hardware failure
Here’s a quick overview of how it works. What’s exposed as storage to the system is pools. Pools may include one or more vdevs. A vdev may include one or more disks of the same capacity.
A vdev can be of multiple types:
- single: it’s just a single disk. Offers no redundancy but still detects data corruption.
- mirror: two or more disks are mirrored, meaning the exact same data is written to all disks. If one disks fails, the continues to operate normally while you replace the faulty disk.
- RAIDZ1: three or more disks are used to store data. Parity is computed for each strip (block of data) and then distributed across the disks. If one disk fails, the vdev continues to operate normally while you replace the faulty disk. The total usable capacity is the total capacity of the disks minus one disk worth of parity. This is similar to RAID5.
- RAIDZ2: similar to RAIDZ1 but with two parity strips. This means two disks can fail before data loss occurs.
In general:
- Mirror requires at least 2 disks to operate. Mirroring with
Ndisks can sustainN-1disk failures. The total usable capacity is the capacity of just one of the disks. - RAIDZ
Nrequires at leastN+2disks to operate and can sustainNdisk failures. The total usable capacity is the sum of the disks’ capacities minusNdisks worth of parity.
For exemple, in RAIDZ2, you need at least 4 disks. Let’s say you have 6 disks with 1 TB of capacity each. The total usable capacity is 4 TB (1 TB × 6 disks - 2 TB of parity). You could lose 2 disks before data loss occurs.
Anytime a faulty disk is replaced, ZFS will automatically start recreating the data that was on the faulty disk using the other disks. In the end, the new disk will be a perfect copy of the faulty disk. This process is called resilvering.
Resilvering can take a while, especially when dealing with terabytes of data. It also depends on the topology of the vdev, and how much the disks are utilized during the process. It’s not uncommon to see resilvering take days.
If you choose a vdev type where only one disk can fail, this resilvering period can be very stressful. It’s unlikely for another disk to fail during this period, but it’s still a risk. And it happens, all the data is irrecoverable. This is why with larger, more numerous disks it’s highly recommended to choose at least RAIDZ2.
Once a vdev is created, you can’t change its type. For exemple, you can’t change a RAIDZ1 to a RAIDZ2.
Integrity checks and automatic repairs
Protection against hardware failure is cool and all but I think integrity checks and automatic repairs really make ZFS stand out. It is achieved by storing a checksum for each block of data. During read operations the checksum is verified. If the checksum does not match, then ZFS knows that the block is corrupted. It will then attempt to repair the data:
- In the case of mirroring, ZFS will use the first copy of the data where the checksum matches to repair the data.
- In the case of RAIDZ, parity data is used to repair the data.
The same way that RAIDZ
Ncan sustainNdisk failures, ZFS can repair a corrupted block as long as one copy of the parity data is available. If more thanNcopies of the data and its parity are corrupted, then the data is irreparable.
Even if ZFS cannot repair the data, it will at least notify you that a block is corrupted.
Furthermore, ZFS doesn’t just wait for data to be read to verify the checksum. It also periodically perform integrity checks and automatic repairs of all the data. This process is called scrubbing.
Extensibility
ZFS mirror and RAIDZ can be expanded by adding new disks to the vdev. In the case of RAIDZ, this is a recent feature that was introduced in OpenZFS 2.2.
You can also replace the disks in a vdev with larger ones. You need to do that one disk at a time and resilver the vdev after each replacement.
Finally, you can simply add more vdevs to a pool.
Hot spares
Disks can be assigned as hot spares for a pool: if a disk fails in any of the vdevs, resilvering can immediately start on one of the spare disks. This can be useful if you can’t readily access the server to replace the faulty disk (e.g: you’re on vacation).
However, if you only have one vdev, I would argue that it’s better to opt in for a more resilient vdev type (e.g: choosing RAIDZ2 instead of RAIDZ1).
In general, it’s still recommended to have a spare disk on hand in case of a hardware failure. This way, you can replace the faulty disk faster and the system will return to a nominal state faster.
Portability
Each disk in a pool has ZFS labels written at the start and end of the device. Those labels contain the pool name, vdev layout, and GUIDs.
So, if you decide to move the pool to another server, you just need to move the disks to the new server. Disk order does not matter (you don’t have to plug them into the same SATA ports, or even the same controller brand). As long as all the required disks are present, ZFS can figure out the correct configuration.
Compression
Another great feature is that ZFS can transparently compress the data. Transparent here means that the data is compressed on write and decompressed on read: the user never realizes that the data is compressed.
It’s not necessary to disable compression on datasets which primarily have incompressible data on them, such as folders full of video or audio files. ZFS is smart enough to not store data compressed if doing so wouldn’t save any on-disk blocks.
It may be counter-intuitive but compression can increase read and write performance. Sure the CPU has to compress and decompress the data, but smaller resulting files also means less data to read or write on the disk. If disk I/O is the bottleneck (e.g: you’re using HDDs), compression will increase effective I/O performance.
Backups
ZFS is uniquely suited for backups. It’s built-in replication and snapshots make it easy to restore data to a previous state.
Snapshots are a frozen, read-only view of the filesystem at a given point in time. The data is not duplicated, any modification after the snapshot creation is tracked separately. So, to restore the filesystem to a given snapshot, you just need to discard those modifications. They are instant to create and space-efficient.
They also offer good protection against user error and ransomware. The snapshots are immutable, so even if all your files get encrypted, you can still restore the filesystem to a previous snapshot.
Importantly, restoring a snapshot means restoring the entire filesystem to that point in time. This can be useful if an update went wrong or if a ransomware attack encrypted most files. If you only need to restore a specific file or folder, this can be achieve as well. Snapshots are read-only but they can be browsed and copied from just like any directory.
Replication is the process of copying snapshots from one ZFS pool to another. It can be used to backup the data to a remote location. Subsequent replications will only copy the differences between the previous snapshot and the current state of the filesystem. So it’s incremental and network-efficient.
Snapshots can be scheduled to be created at a given frequency. Retention policies can be set to automatically delete old snapshots. The same can be done for replications. You can decide to only replicate snapshots at a given frequency. Replication and retention policies can be set on a folder by folder basis if needed.
Snapshot frequency, replication frequency, and retention should reflect your tolerance for data loss. For me, I’m okay with losing a week of data if my home is burned to the ground or a thief breaks in. This means I don’t need replication to be any more frequent than once a week.
This is the proposed policy for the main server:
- A snapshot is created every hour.
- Hourly snapshots for the last 24 hours → rollback from accidental deletes or ransomware.
- Daily snapshots for the last 7 days → covers recent human error.
- Weekly snapshots for the last 4 weeks → medium-term rollback.
- Monthly snapshots for the last 6 months → long-term baseline.
- Replication to the backup server is done weekly.
On the backup server, I can have a longer retention policy:
- Weekly snapshots for the last 12 weeks.
- Monthly snapshots for the last 24 months.
- Yearly snapshots kept until the backup server runs out of space.
The “3-2-1” rule
You’ve probably heard of the 3-2-1 backup rule. It’s a simple backup strategy that ensures you have at least 3 copies of your data, 2 on different media, and 1 offsite. So far, we have planned for 2 copies of the data, including 1 offsite.
There are three major media types:
- Magnetic storage: HDD, tape
- Optical storage: DVD, Blu-ray
- Solid-state storage: SSD, NVMe
We are already using magnetic storage in the form of HDDs in the main and backup servers. Beside the cost, it would be silly to use SSDs for backup purposes and not for the live data.
That leaves us with optical storage for the third copy. Blu-ray discs have gone down in price. They sit today at around 30 € per TB. The drive/burner itself cost below 100 €.
There is also the Optical Disc Archive technology, which promises larger capacity (up to 5.5 TB per cartridge) and longer lifespan (up to 100 years). But the technology is officially discontinued since 2023. The cartridges are not that much more expensive at 40 € per TB. But the drive itself is impossible to buy new, and the used ones are above 1 000 €.
Finally we have the M-DISC technology, which are basically Blu-ray discs with a different type of material that’s more durable. The claim is that they can last up to 100 years. The price is around 180 € per TB. Basically every BD drive can read M-DISC discs, but only compatible drives can burn them. The drive is around 120 €.
| Media | Price per TB | Price of the drive | Average longevity |
|---|---|---|---|
| Blu-ray | 30 € | 100 € | 10-20 years |
| Blu-ray M-DISC | 180 € | 120 € | 100 years |
| Optical Disc Archive | 40 € | 1 000 € | 100 years |
Based on the price per TB, if I have a replacement cycle every 10 years, regular BD would be more cost-effective for the first 60 years. In the next 60 years, it’s very likely that new technology will be released and make the M-DISC completely obsolete.
Beside, if I replace the set of discs every 10 years, it means I’ll technically have more than one copy of the data on optical discs. Beside having more copies, it will give me the opportunity to collect empirical data on the disc aging.
So in conclusion, I’ll be using Blu-ray discs for the third copy. Here’s the plan:
- Verbatim BD-R DataLifePlus 50GB 6X
- Burn them at low speed with verification and keep checksums of the data on the discs themselves and on the other storage media.
- Integrity checks of the discs every year.
- Replace the set of discs every 10 years.
- Continue monitoring discs from the previous set to learn more about their actual longevity.
- Keep an eye out for new technologies that could be replace Blu-ray discs for the next replacement cycle.
Other tips:
- Store optical discs vertically in standard jewel cases without additional materials in the case.
- Only label discs with a water-based permanent marker on the clear inner hub, not the top surface.
- 20-50% humidity and temperatures between 15-25°C are ideal.
More info at this article on Optical Discs by the Canadian Conservation Institute.
Memory
Error-correcting code memory, commonly known as ECC Memory, is a type of RAM known for its data integrity and reliability. This specialized type of computer data storage uses a more sophisticated technology than standard RAM to detect and automatically correct internal data corruption.
The ECC procedure typically involves adding a few extra bits to each chunk of data stored in memory. These extra bits, known as parity bits, allow the system to determine if the data has been corrupted. If an error is detected, the ECC memory can often find the exact bit that is incorrect and restore it to the proper value without the user or the running program even realizing anything happened.
To use ECC memory, we need:
- A CPU that supports ECC
- A motherboard that supports ECC
- A memory stick that supports ECC
It needs support at all levels because ECC not only protects the data when in RAM, but also as it travels between the CPU registers and the RAM sticks.
Of course the tradeoff is that ECC memory is more expensive. Also, finding a consumer-grade CPU and motherboard that support ECC memory can be difficult.
ECC memory is one more protection against data corruption. It’s complementary to the other protection mechanisms provided by ZFS.
Monitoring
As stated earlier, I’m unhappy about my lack of monitoring and alerting on the previous home lab. This time, I want to make sure things are working as expected and be alerted as soon as possible if something goes wrong.
Here’s a list of the metrics I want to monitor:
- Servers
- Ressource usage: CPU, RAM, storage, disk I/O, network
- Temperature: CPU, disks, room
- Disks SMART status
- System updates
- UPS
- Status
- Battery level,temperature, and health
- Temperature
- Costs
- Electricity cost
- ISP subscription
- VPS subscription
- Hardware cost
- CrowdSec
- Blocked requests count (total, by scenario)
- Blocked IPs (total, by scenario)
- Traefik
- Requests count (total, by domain)
- Requests latency (avg, max, min)
- Errors count (total, by status code)
- Geographic distribution (top 10 countries)
- ZFS
- Pool health, error counts and scrub status
- Snapshots jobs and current retention
- Replication jobs
- Services
- Ping or health-check uptime
- Image updates
Then I can setup alerts when those metrics are outside of acceptable ranges. For exemple:
- The scheduled scrub is not running on time
- Storage is almost full
- Temperatures have been above a threshold for some time
- Power surges or outages
- Services seem unavailable
Threats and mitigations
As a recap of everything I’ve mentioned so far, here’s a list of potential threats and how I plan to mitigate them:
-
Hardware threats
- Disk failures
- Covered by RAIDZ on both main and backup servers.
- SMART monitoring and alerts for signs of imminent failure.
- Alerting when a disk fails so that it can be replaced ASAP.
- Spare disks ready to swap in if needed.
- Data corruption
- Covered by ZFS block checksums.
- Self-healing by ZFS.
- Checked by monthly scrubbing on both main and backup servers.
- ECC memory participating in data integrity on the main server.
- UPS for clean shutdowns on both main and backup servers.
- Power outages and surges
- Covered by UPS on both main and backup servers.
- Bi-yearly UPS battery test.
- Overheating
- Monitor temps including disks temps.
- Monitor room temps and adjust fans accordingly.
- Use dust filters and clean them regularly.
- Ensure positive pressure in the computer cases to recude dust accumulation.
- Disk failures
-
Provider threats
- ISP issues (CGNAT, IPv4 change, outage, blocking ports)
- Tunnel to the bastion server using Pangolin.
- Could still use my phone or a 4G/5G router as a backup.
- VPS provider failure
- Backups to the backup server.
- If the VPS is unreachable, I could relatively quickly switch to another VPS provider using the latest backup.
- ISP issues (CGNAT, IPv4 change, outage, blocking ports)
-
Malicious threats
- Bot attacks / DDoS
- Covered by the bastion server (Pangolin + CrowdSec).
- Reduce attack surface by making sure only a few ports are open.
- Ransomware
- Recoverable using local ZFS snapshots and remote backups.
- Vulnerabilities
- Keep packages and Docker images up to date.
- Enforce SSH key only authentication on all hosts.
- Enforce 2FA on publicly accessible services.
- Audit ~/.ssh/authorized_keys and /etc/sudoers regularly.
- Network segmentation between containers.
- Network segmentation between the home lab and other devices on the local network.
- Disaster / theft
- Use locks and chains to secure the servers and slow down / discourage thieves.
- Offsite backup
- Bot attacks / DDoS
-
Human threats
- Accidental deletion / overwriting
- Covered by local ZFS snapshots and remote backups.
- Disk misplacement during maintenance
- Use stickers to mark the disks and their assigned location.
- Refer to that label when alerting about a disk needing to be replaced.
- Forgetting my own setup
- Scripts to bring a fresh Debian server to a working state.
- Docker Compose and documentation for each service.
- Infrastructure-as-Code.
- Accidental deletion / overwriting
-
Operational risks
- Backup failures
- Monthly restoration test.
- Monitoring of ZFS replication jobs.
- Over-utilized resources: alerting
- Alerting failures
- Have weekly alerts just to confirm that things are working as expected.
- Monthly manual checks.
- Backup failures
Planning the hardware
Main server
So, for the main server, I have a few requirements:
- Support up to 8 × 3.5” HDDs (although I’m not likely to use more than 6)
- Support for 2 × NVMe SSDs (or at least SATA SSDs)
- ECC memory would be nice
- 32 GB of memory (upgradeable to 64 GB if needed)
- Efficiency is very important considering the system will run 24/7
- Hardware acceleration for video transcoding and AI workloads
- CPU performance should be sufficient. I like to use PassMark scores to compare CPUs. Let’s aim for a score of 20 000 or more.
- 6 cores / 12 threads minimum
- 65 W TDP for the CPU
Cases
The complexity is to find a case that will accomodate at least 6 × 3.5” disks. This is becoming increasingly difficult as nowadays people will likely use a NVMe SSD and maybe one or two 3.5” HDDs.
They are some specialized “PC NAS” cases, but they are typically quite expensive and value compactness. This means that the motherboard will typically be Mini-ITX or Micro-ATX, which are typically more expensive and provide less slots and features.
Then they are rack mounted cases, which are also expensive. Typically, you can use any size of motherboard but you are still limited by the height of the case. This means the CPU cooler and the GPU need to be low profile. You can easily find cases with at least 6 × 3.5” bays and some with hot-swappable bays on the front of the case which makes maintenance very convenient.
Tower cases
Here’s a few I like:
-
Jonsbo N3
- 8 × 3.5” HDD bays
- Mini ITX motherboard
- SFX PSU (up to 105 mm in length)
- Use a HDD backplate, needs 2 molex connectors to power all drives
- 2 × 100 mm fans + 2 × 80 mm fans
- 250 mm wide, 210 mm tall, 374 mm deep
-
Fractal Design Node 304
- 6 × 3.5” HDD bays
- Mini ITX, Mini DTX motherboard (avoid angled SATA connectors)
- ATX PSU (up to 160 mm in length)
- No HDD backplate
- 2 × 92 mm fans + 1 × 140 mm fan
- 233 mm wide, 298 mm tall, 262 mm deep
-
Fractal Design Node 804
- 10 × 3.5” HDD bays + 2 × 2.5” SSD bays
- Micro ATX, Mini ITX motherboard
- ATX PSU (up to 260 mm in length)
- No HDD backplate
- 2 × 92 mm fans + 1 × 140 mm fan
- 344 mm wide, 307 mm tall, 389 mm deep
Rack mounted
- “19-inch” is the most common rack width. The minimum opening width is 450 mm and the width of the cabinet is 24 inches (600 mm).
- Rack mounted equipment also comes in standardized U height units. 1U is 1.75 inches (44.45 mm).
- A 1U server is 44.45 mm tall.
- A 2U server is 88.9 mm tall.
- A 3U server is 133.35 mm tall.
- A 4U server is 177.8 mm tall.
- Racks also comes in U units. So you buy a 16U rack, you can put 16U worth of equipment in it.
- Racks depth is not standardized. If the rack is enclosed, you have to make sure the equipment fits.
Here’s one I like:
- Inter-Tech IPC 3U-3508
- https://www.inter-tech.de/productdetails/3U-3508_EN.html
- 8 × 3.5” hot-swappable HDD bays
- 2 × 2.5” internal SSD bays
- Mini-ITX, Micro-ATX, ATX motherboards
- ATX PSU
- 2 × 80 mm fans + 2 × 60 mm fans
- max. 100 mm tall CPU cooler / GPU
- max. 244 mm long GPU
- 480 mm wide, 132 mm tall, 528 mm deep (3U rack)
Motherboards
For the motherboard, it’s not too difficult to find one with 6 SATA ports. If we want more SATA ports, we have a few options:
- Specialized motherboards with more SATA ports (rare, expensive)
- M.2 to SATA adapter (up to 6 SATA ports)
- PCIe to SATA adapter
- PCIe to SAS + SAS to SATA cable (typically 2 SAS ports, which means 8 SATA ports)
- If you really want to go crazy, you can use a PCIe x16 to 4x4 bifurcation cards to convert a single PCIe x16 slot to 4 × M.2 slots. Then you can use a M.2 to SATA adapter on each M.2 slot. This means 24 SATA ports.
Other recommendations:
- Update the BIOS before installing the CPU: they have been user reporting that their newly bought CPU (e.g: Ryzen 9000 series) got overvolted when installed on a motherboard that didn’t support the CPU without a BIOS update.
- Prefer ASRock or ASUS motherboards if you want to use ECC memory. Most other brands don’t support it.
ECC Memory
CPU
- Ryzen 3000/4000
- Without integrated graphics: support ECC memory
- With integrated graphics:
- Pro variant: support ECC memory
- Non-Pro variant: no support
- Ryzen 5000
- Without integrated graphics:
- Ryzen 5 5500: no support
- Others: support ECC memory
- With integrated graphics:
- Pro variant: support ECC memory
- Non-Pro variant: no support
- Without integrated graphics:
- Ryzen 7000: support ECC memory
- Ryzen 8000
- Pro variant: support ECC memory
- Non-Pro variant: no support
- Ryzen 9000: support ECC memory
For the AM5 platform we have this handy community spreadsheet.
Motherboard
In general, Asus and ASRock motherboards support ECC memory. Other brands typically don’t.
For the AM5 platform we have this handy community spreadsheet.
Memory stick
Look for ECC UDIMM (Unbuffered DIMM).
- Avoid RDIMM (Registered DIMM), which is only available in workstation / server motherboards.
- Avoid “on-die ECC” only. It is a required feature on DDR5 memory sticks, but only corrects single-bit errors within the memory chip itself.
GPU
A GPU (dedicated or integrated) is not strictly necessary. But it can be useful for:
- Simply to display a video output (accessing the BIOS, debugging, etc…)
- Image processing (generating thumbnails)
- Video transcoding (Jellyfin, Plex)
- AI workloads (Immich face recognition, LLMs)
For video transcoding, Jellyfin recommends: - Intel Arc A series or newer - Nvidia GTX16/RTX20 series or newer (Excluding GTX1650) - AMD is NOT recommended.
NVIDIA provides a list of supported video encoding and decoding features for their GPUs. Overall, NVIDIA GPUs are pricier but well regarded for their gaming and video transcoding capabilities.
Entry-level Intel Arc GPUs are considered mediocre for gaming but provide excellent video transcoding capabilities considering their price, consumption, and size.
AMD GPUs are considered behind the competition when it comes to video transcoding. Even when the codecs are supported, performance or image quality may be lacking.
Depending on the choice of case, we may have to look for a low profile GPU.
PSU
Considering the rest of the requirements, we can expect the system to draw a maximum of 400 W. This is because HDDs will draw significantly more power at startup than during normal operation.
During normal operation, the system should draw around 120 W.
Any PSU rated for 550 W or higher should be sufficient.
Obviously, efficiency is important for a home lab that will run 24/7. For example, the be quiet! PURE POWER 12 M 650 W advertises a 80+ Gold rating. This means:
- at 20 % load, the efficiency is at least 90 %.
- at 50 % load, the efficiency is at least 92 %.
- at 100 % load, the efficiency is at least 89 %.
So the efficient should be above 90 % most of the time, which is great. I would recommend at least a 80+ Gold rating.
It can be difficult to find a PSU with sufficient amount of SATA or PATA (aka molex) cables out of the box. If the PSU is modular, you should check if the PSU has enough “Drives” / “SATA/PATA” ports. If so, maybe the manufacturer provided cables that can be purchased separately.
It’s also possible to buy compatible SATA/PATA cables from cablemod for about 10 € per cable, 15 € for shipping.
Considering that I’m not likely to use more than 6 × 3.5” HDDs, I don’t have to worry about how much current is going through the 12 V lanes. Research into it if you’re using more disks.
TODO: add my research on power efficiency
Storage
You can easily check what’s the best price for different storage types and capacities at diskprices.com.
For ZFS, it’s important that the hard drives are not SMR or else the performance will worsen. This can make resilvering much slower. You can use this list to check if disk is not SMR. CRM is the preferred type.
Complete builds
Build A: cheapest AM4, no ECC
| Component | Name | Price |
|---|---|---|
| Rack | Inter-Tech IPC 3U-3508 | 200 € |
| Motherboard | MSI B550-A PRO | 100 € |
| CPU | Ryzen 5 5500 | 80 € |
| Cooler | Noctua NH-L12Sx77 | 80 € |
| RAM | Integral 32 GB DDR4-3200 | 70 € |
| GPU | Sparkle Arc A380 GENIE | 130 € |
| PSU | be quiet! Pure Power 12M 750 W | 130 € |
| NVMe | 2 × Crucial P310 SSD 500 GB | 100 € |
| HDDs | 4 × WD Ultrastar DC HC320 8 TB | 530 € |
| Total | 1 420 € |
Note: Ryzen 5000 series processors can support DDR4-3200 memory with two sticks but only 2 666 MHz on 4.
Build B: AM4, with ECC memory
| Component | Name | Price |
|---|---|---|
| Rack | Inter-Tech IPC 3U-3508 | 200 € |
| Motherboard | ASROCK B550 Pro4 | 100 € |
| CPU | Ryzen 7 5700X | 150 € |
| Cooler | Noctua NH-L12Sx77 | 80 € |
| RAM | Timetec Hynix IC DRR4-2666 2x16 GB | 100 € |
| GPU | Sparkle Arc A380 GENIE | 130 € |
| PSU | be quiet! Pure Power 12M 750 W | 130 € |
| NVMe | 2 × Crucial P310 SSD 500 GB | 100 € |
| HDDs | 4 × WD Ultrastar DC HC320 8 TB | 530 € |
| Total | 1 520 € |
Build C: AM5, with ECC memory
| Component | Name | Price |
|---|---|---|
| Rack | Inter-Tech IPC 3U-3508 | 200 € |
| Motherboard | ASROCK B850 Pro RS | 200 € |
| CPU | Ryzen 7 9700X | 280 € |
| Cooler | Noctua NH-L12Sx77 | 80 € |
| RAM | Kingston Server Premier 32 GB DDR5-5600 ECC | 200 € |
| GPU | Sparkle Arc A380 GENIE | 130 € |
| PSU | be quiet! Pure Power 12M 750 W | 130 € |
| NVMe | 2 × Crucial P310 SSD 500 GB | 100 € |
| HDDs | 4 × WD Ultrastar DC HC320 8 TB | 530 € |
| Total | 1 850 € |
Let’s compare the two ECC options, with similar class CPUs:
| Criteria | Build A | Build B | Build C |
|---|---|---|---|
| Total price | 1 420 € | 1 520 € | 1 850 € |
| Core / Thread | 6 / 12 | 8 / 16 | 8 / 16 |
| Single thread score | 3 059 | 3 385 | 4 656 |
| CPU score | 19 321 | 26 608 | 37 180 |
| PCIe slot | 4.0 | 4.0 | 5.0 |
| RAM frequency | 3 200 MHz | 2 666 MHz | 5 600 MHz |
| ECC | ❌ | ✅ | ✅ |
AM4 is almost 10 years old now—and while the platform continues to be supported with new releases like the Ryzen 5 5500X3D in June 2025—AMD has mostly transitioned to AM5. The latter is newer, being released in September 2023. AMD officially stated supporting AM5 throughout 2027. Thus, the newer platform is more future-proof.
The motherboard offers a PCIe 5.0 slot and M.2 Gen5 whereas AM4 is limited to PCIe 4.0 and M.2 Gen4. We also have a 2.5 Gb/s LAN port instead of a 1 Gb/s one.
We can start with 4 HDDs in RAIZ2, which gives us 16 TB of usable storage. This can be expanded in the future to
- 24 TB with 5 HDDs
- 32 TB with 6 HDDs
- 40 TB with 7 HDDs
- 48 TB with 8 HDDs
Backup server
Here a few ideas for the backup server:
- The short term snapshots can be stored on the main server, the long term snapshots can be stored on the backup server.
- This means the backup server doesn’t have to run 24/7, it can be powered strictly when replication is happening.
- If we decide that the shortest granularity stored on the backup server is 1 week, we can only power it on once a week.
With only 4 HDDs in RAIDZ1, we can use pretty much any case and ATX motherboard. I already have a computer I can repurpose for this. However the motherboard doesn’t support ECC memory. I think I’ll consider this an upgrade path in the future but stick to non-ECC memory for now.
| Component | Name | Price |
|---|---|---|
| Case | Corsair Carbide 175r | — € |
| Motherboard | MSI B450 Gaming Plus | — € |
| CPU | Ryzen 5 3600 | — € |
| Cooler | Stock cooler | — € |
| RAM | Kingston Fury DDR4-2666 16 GB | — € |
| PSU | Seasonic SSR-650FX FOCUS Plus Gold 650 W | — € |
| NVMe | Samsung Evo 970 Evo plus 512 GB | — € |
| NVMe | Crucial P310 SSD 500 GB | 30 € |
| HDDs | 4 × Seagate EXOS X16 16 TB | 880 € |
| Total | 910 € |
Routers
- MikroTik Hex routers
UPS
- BX1600MI-FR
Shopping list
For the main server:
| Component | Name | Price |
|---|---|---|
| Rack | Inter-Tech IPC 3U-3508 | 197.71 € |
| Motherboard | ASROCK B850 Pro RS | 194.76 € |
| CPU | Ryzen 7 9700X | 279.00 € |
| Cooler | Noctua NH-L12Sx77 | 84.90 € |
| RAM | Kingston Server Premier 32 GB DDR5-5600 ECC | 203.27 € |
| GPU | Sparkle Arc A380 GENIE | 144.03 € |
| PSU | be quiet! Pure Power 12M 750 W | 127.75 € |
| NVMe | 2 × Crucial P310 SSD 500 GB | 69.82 € |
| HDDs | 4 × WD Ultrastar DC HC320 8 TB | 535.96 € |
| Card | M.2 to SATA3.0 Adapter Card ASM1166 | 19.19 € |
| Cable | 2 × Sata To Sata Cable 4 Ports 0.5M | 4.19 € |
| Cable | Sata To Sata Cable 2 Ports 0.5M | 3.95 € |
| Cable | 2 × SATA to Molex | 9.08 € |
| Fan | 2 × Noctua NF-A6x25 PWM 80mm | 33.80 € |
| Fan | 2 × Noctua NF-A8 PWM 80mm | 37.80 € |
| Total | 1 945.21 € |
For the backup server:
| Component | Name | Price |
|---|---|---|
| NVMe | Crucial P310 SSD 500 GB | 34.91 € |
| HDDs | 4 × Seagate EXOS X16 16 TB | 887.43 € |
| Total | 922.34 € |
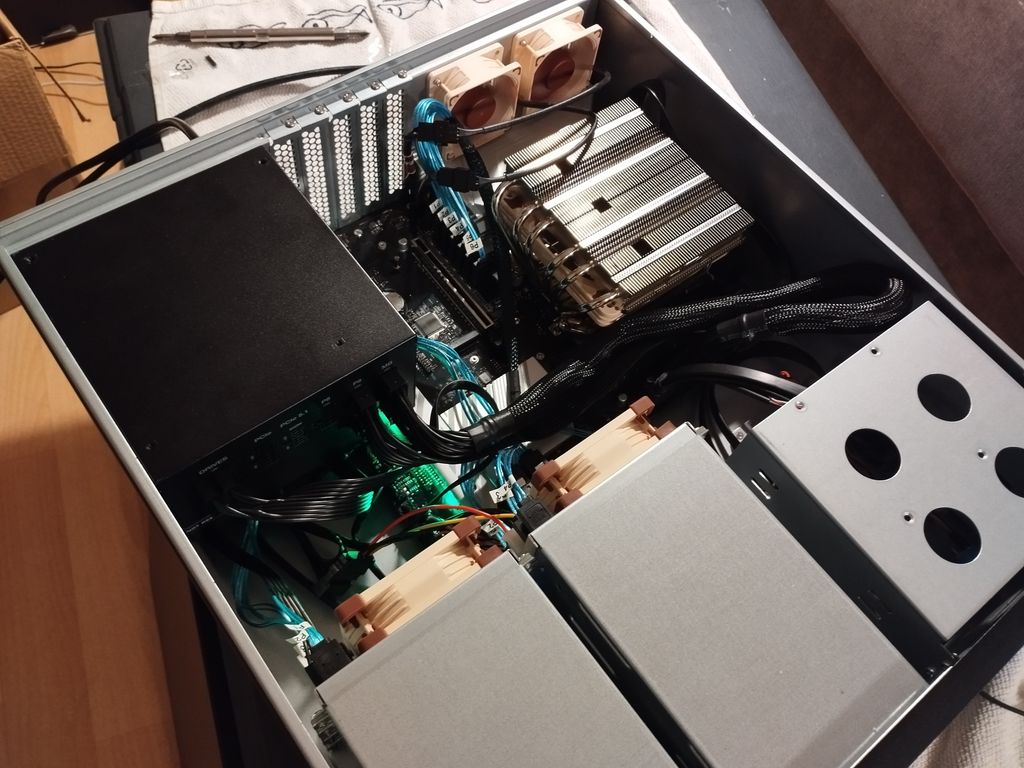
Building the servers
- I was surprised that the cooler wasn’t aligned with the CPU but offset by 0.7mm. I thought something was wrong but actually it’s because the CPU has a chiplet design with most of the heat being produced at the bottom of the chip. See this video for more details.
- BIOS Flashback: https://www.youtube.com/watch?v=fqKs9fekNNY
Software configuration
Install Debian
- Download the netinstall image
- Burn it to a USB stick
- Connect the USB stick to the server, make sure the Ethernet cable is also connected.
- Boot into the installer. Select either “Install” or “Graphical install”.
- Language: English
- Locale: United States (en_US)
- Keymap: French
- Hostname: melchior
- Keep domain name empty
- Provide a password for the root user
- Confirm the password
- Create a new user: tom
- Provide a password for the tom user
- Use “Guided: use entire disk” to partition the disk
- Select the right disk to use, based on the size and name of the disk
- Select “All files in one partition (recommended for beginners)”
- Write changes to disk: yes
- Keep default settings for the installation of the packages
- Software selection: only keep “SSH server” selected
- Install GRUB boot loader to your primary drive: yes
- Select the same disk as before for the boot loader installation
- When it says “Installation complete”, remove the USB stick and press continue to reboot the server
Change the password
passwdInstall and enable Fail2Ban
apt install fail2ban
systemctl enable fail2ban
systemctl start fail2ban
Check status:
systemctl status fail2banSet static IP
nano /etc/network/interfacesYou’ll see something like this:
# The primary network interface
allow-hotplug enp6s0
iface enp6s0 inet dhcp
Replace the dhcp with static and add the following lines:
# The primary network interface
allow-hotplug enp6s0
iface enp6s0 inet dhcp
iface enp6s0 inet static
        address 192.168.70.67
        netmask 255.255.255.0
        gateway 192.168.70.1
Reboot the server to apply the changes.
Synchronize time
apt-get install systemd-timesyncd
systemctl enable systemd-timesyncd --now
You can check it’s synchronized with:
timedatectl Local time: Sun 2025-11-02 16:15:39 CET
Universal time: Sun 2025-11-02 15:15:39 UTC
RTC time: Sun 2025-11-02 15:15:38
Time zone: Europe/Paris (CET, +0100)
System clock synchronized: yes
NTP service: active
RTC in local TZ: no
Install Docker
apt-get update
apt-get install ca-certificates curl
install -m 0755 -d /etc/apt/keyrings
curl -fsSL https://download.docker.com/linux/debian/gpg -o /etc/apt/keyrings/docker.asc
chmod a+r /etc/apt/keyrings/docker.asc

echo \
  "deb [arch=$(dpkg --print-architecture) signed-by=/etc/apt/keyrings/docker.asc] https://download.docker.com/linux/debian \
  $(. /etc/os-release && echo "$VERSION_CODENAME") stable" | \
  tee /etc/apt/sources.list.d/docker.list > /dev/null
apt-get update
apt-get install docker-ce docker-ce-cli containerd.io docker-buildx-plugin docker-compose-plugin
You can check the status of the Docker service with:
systemctl status dockerConfigure Loki with Docker plugin
docker plugin install grafana/loki-docker-driver:3.3.2-amd64 --alias loki --grant-all-permissionsAdd the following to each docker compose service:
logging:
  driver: loki
  options:
    loki-url: "http://localhost:3100/loki/api/v1/push"
    loki-retries: 2
    loki-max-backoff: 800ms
    loki-timeout: 1s
    keep-file: "true"
    mode: "non-blocking"
Avoid logging Loki or Grafana’s containers as it can create a feedback loop.
Install JavaScript runtimes and tools
apt install nodejs npmPM2 process manager
Install:
npm install -g pm2Logrotate is a module for PM2 that automatically manages and rotates log files to prevent them from consuming too much disk space.
pm2 install pm2-logrotateTo preserve the running services after a reboot:
pm2 startup
pm2 save
Run pm2 save after adding or removing services to preserve the configuration after a reboot.
Other useful tools
To monitor system resources:
apt install lm-sensors smartmontools btopTo easily explore the filesystem and see what’s taking up space:
apt install ncduMain server (Melchior)
Install ZFS
Add backports to your sources.list:
apt install lsb-release
codename=$(lsb_release -cs);echo "deb http://deb.debian.org/debian $codename-backports main contrib non-free"|tee -a /etc/apt/sources.list
Install the packages:
apt update
apt install linux-headers-amd64
apt install -t stable-backports zfsutils-linux
Press Enter in the license agreement prompt.
Create the HDD pool
Get the list of disks’ UUIDs:
ls -l /dev/disk/by-id/lrwxrwxrwx 1 root root 9 Sep 21 13:41 wwn-0x5000cca0bbe63bb3 -> ../../sdd
lrwxrwxrwx 1 root root 9 Sep 21 13:41 wwn-0x5000cca0bbe68f2e -> ../../sdc
lrwxrwxrwx 1 root root 9 Sep 21 13:41 wwn-0x5000cca0bbe693ad -> ../../sdb
lrwxrwxrwx 1 root root 9 Sep 21 13:41 wwn-0x5000cca0bbf58929 -> ../../sdaDetermine the right ashift value:
lsblk -o NAME,PHY-SeC,SIZE,TYPE /dev/sd[a-d]NAME PHY-SEC SIZE TYPE
sda 4096 7.3T disk
sdb 4096 7.3T disk
sdc 4096 7.3T disk
sdd 4096 7.3T diskWe see that the PHY-SEC is 4096. This gives us ashift=12 (2^12 = 4096).
Create the RAIDZ2 pool (this will erase everything on these drives. Make sure there’s nothing you care about on them):
zpool create \
  -o ashift=12 \
  -O acltype=posixacl \
  -O xattr=sa \
  -O compression=zstd \
  -O atime=off \
  -O relatime=off \
  -O normalization=formD \
  -m /data \
  data raidz2 \
  /dev/disk/by-id/wwn-0x5000cca0bbe63bb3 \
  /dev/disk/by-id/wwn-0x5000cca0bbe68f2e \
  /dev/disk/by-id/wwn-0x5000cca0bbe693ad \
  /dev/disk/by-id/wwn-0x5000cca0bbf58929
You can add -f to force the creation of the pool (it may be necessary if the disks already have a filesystem on them).
Create the SSD pool
lsblk -fNAME FSTYPE FSVER LABEL UUID FSAVAIL FSUSE% MOUNTPOINTS
sda
├─sda1 zfs_member 5000 data 3786879799329643345
└─sda9
sdb
├─sdb1 zfs_member 5000 data 3786879799329643345
└─sdb9
sdc
├─sdc1 zfs_member 5000 data 3786879799329643345
└─sdc9
sdd
├─sdd1 zfs_member 5000 data 3786879799329643345
└─sdd9
nvme1n1
nvme2n1
├─nvme2n1p1 vfat FAT32 1083-1133 965.3M 1% /boot/efi
├─nvme2n1p2 ext4 1.0 0201fa06-8444-490c-ba9d-c926c5010a94 393.7G 4% /
└─nvme2n1p3 swap 1 5c7b6301-be42-4e3f-9365-6672853ac470 [SWAP]
nvme0n1
└─nvme0n1p1 ext4 1.0 c4a339bb-78bc-4156-9232-70e9324a1ff1Here I can see that my 4 disks are listed as zfs_members.
The OS NVMe is nvme2n1 because that’s the one with the mounted partitions (boot and root).
So I’ll create a new pool with nvme0n1 and nvme1n1.
I can get their ids with this command:
ls -l /dev/disk/by-id/ | grep -w nvme[0-1]n1lrwxrwxrwx 1 root root 13 Oct 1 20:19 nvme-CT500P310SSD8_25164FAF1C4F -> ../../nvme0n1
lrwxrwxrwx 1 root root 13 Oct 1 20:19 nvme-CT500P310SSD8_25164FAF1C4F_1 -> ../../nvme0n1
lrwxrwxrwx 1 root root 13 Oct 1 20:19 nvme-eui.0025385691b4ebc8 -> ../../nvme1n1
lrwxrwxrwx 1 root root 13 Oct 1 20:19 nvme-eui.00a075014faf1c4f -> ../../nvme0n1
lrwxrwxrwx 1 root root 13 Oct 1 20:19 nvme-Samsung_SSD_970_EVO_Plus_500GB_S4EVNF0M698680B -> ../../nvme1n1
lrwxrwxrwx 1 root root 13 Oct 1 20:19 nvme-Samsung_SSD_970_EVO_Plus_500GB_S4EVNF0M698680B_1 -> ../../nvme1n1
For NVMe disks, it’s common to find multiple symlinks. Any of them should work. I’ll choose the human readable ones (CT500 and Samsung) without the “_1” suffix.
zpool create \
  -o ashift=12 \
  -O acltype=posixacl \
  -O xattr=sa \
  -O compression=zstd \
  -O atime=off \
  -O relatime=off \
  -O normalization=formD \
  -m /fast \
  fast mirror \
  /dev/disk/by-id/nvme-CT500P310SSD8_25164FAF1C4F \
/dev/disk/by-id/nvme-Samsung_SSD_970_EVO_Plus_500GB_S4EVNF0M698680BImport the pools
If the pools were already created on another server, you can import them with:
zpool import pool: ssd
id: 4664139631714187601
state: ONLINE
status: The pool was last accessed by another system.
action: The pool can be imported using its name or numeric identifier and
the '-f' flag.
see: https://openzfs.github.io/openzfs-docs/msg/ZFS-8000-EY
config:
ssd ONLINE
mirror-0 ONLINE
nvme-CT500P310SSD8_25164FAF1C4F ONLINE
nvme-Samsung_SSD_970_EVO_Plus_500GB_S4EVNF0M698680B ONLINE
pool: hdd
id: 3786879799329643345
state: ONLINE
status: The pool was last accessed by another system.
action: The pool can be imported using its name or numeric identifier and
the '-f' flag.
see: https://openzfs.github.io/openzfs-docs/msg/ZFS-8000-EY
config:
hdd ONLINE
raidz2-0 ONLINE
wwn-0x5000cca0bbe63bb3 ONLINE
wwn-0x5000cca0bbe68f2e ONLINE
wwn-0x5000cca0bbe693ad ONLINE
wwn-0x5000cca0bbf58929 ONLINECreate the mounting points:
mkdir /data /servicesImport each pool:
zpool import -f hdd
zpool import -f ssd
Check that the pools are imported:
zpool listSetup ZFS snapshots and retention policy
Install sanoid:
apt install sanoidIf it doesn’t already exists, create the sanoid folder in /etc:
mkdir /etc/sanoidEdit the config file:
nano /etc/sanoid/sanoid.conf[hdd]
use_template = production
[ssd]
use_template = production
[template_production]
frequently = 0 # every 15 minutes (disabled)
hourly = 24 # keep 24 hourly snapshots
daily = 7 # keep 7 daily snapshots
weekly = 4 # keep 4 weekly snapshots
monthly = 6 # keep 6 monthly snapshots
autosnap = yes
autoprune = yesThen enable Sanoid with this command:
systemctl enable --now sanoid.timerCheck that it’s running properly with
systemctl status sanoid.timerList the snapshots with
zfs list -t snapshotSome info:
- Sanoid runs (by default) every 15 minutes via sanoid.timer.
- If autosnap is enabled, it will take snapshot periodically. The frequency is determined from the configuration (here, it will take a new snapshot every hour).
- Sanoid completely ignore manually taken snapshot when it comes to its snapshot sheduling and retention policy. It only cares about snapshot that follow its naming scheme.
- You can force Sanoid to take a snapshot right now:
sanoid -c /etc/sanoid/sanoid.conf --run hdd. This one will be subject to Sanoid retention policy. - You can test run the config using
sanoid --debug
Other useful ZFS commands
Rename a pool
Warning: export will unmount the pool. Here I’ll raname data to hdd.
zpool export data
zpool import data hddChange mountpoint
zfs set mountpoint=/services ssdImport pool from another server
Show how to mount the ZFS pools when migrated to a new server or if we have reinstalled the OS.
Bastion server
apt update
apt upgrade
apt-get install ca-certificates curl
install -m 0755 -d /etc/apt/keyrings
curl -fsSL https://download.docker.com/linux/debian/gpg -o /etc/apt/keyrings/docker.asc
chmod a+r /etc/apt/keyrings/docker.asc
echo \
"deb [arch=$(dpkg --print-architecture) signed-by=/etc/apt/keyrings/docker.asc] https://download.docker.com/linux/debian \
$(. /etc/os-release && echo "$VERSION_CODENAME") stable" | \
tee /etc/apt/sources.list.d/docker.list > /dev/null
apt-get update
apt-get install docker-ce docker-ce-cli containerd.io docker-buildx-plugin docker-compose-plugincurl -fsSL https://digpangolin.com/get-installer.sh | bash
./installerDo you want to install Pangolin as a cloud-managed (beta) node? (yes/no): no
Enter your base domain (no subdomain e.g. example.com): barillot.net
Enter the domain for the Pangolin dashboard (default: pangolin.barillot.net):
Enter email for Let's Encrypt certificates: letsencrypt@barillot.net
Do you want to use Gerbil to allow tunneled connections (yes/no) (default: yes):
=== Email Configuration ===
Enable email functionality (SMTP) (yes/no) (default: no):
=== Advanced Configuration ===
Is your server IPv6 capable? (yes/no) (default: yes):
=== Generating Configuration Files ===
Configuration files created successfully!
=== Starting installation ===
Would you like to install and start the containers? (yes/no) (default: yes):
Would you like to run Pangolin as Docker or Podman containers? (default: docker):Other resources
Showcase
Add photos and tests that confirm if the homelab is reaching my initial goals.
Conclusion
Regrets
- Overkill much
- ECC seems overkill
- Useless second PCI-e slot because the PSU
- A slightly longer case would make building it easier and could provide a better airflow.
Future improvements
- Main server
- Upgrade to 64 GB of RAM
- Add a 5.5” AMOLED touch screen in the full-height 5.5” bay in the front of the rack mounted case
- Backup server
- Use ECC memory. This would require a new motherboard and memory sticks. The CPU already supports ECC.